
By now we had a rudimentary web site, which was hosted by CompuServe, and accessible by a long and complicated address. It was difficult and temperamental but, with the advent of digital cameras, it gave us somewhere to display our work. At the same time we were exhibiting at various shops and national and local craft shows, giving talks and workshops whenever asked and always attending the Maths conference in the Easter holidays. Interest in our work was spreading, by word of mouth.
As news of our wall-
It took quite a long time to decide on the format of the instruction booklet. They
had to be patterns that any knitter, or beginner, could follow, without the shorthand
used in most patterns. We felt that knitters should know what they were doing, what
they should expect to see and why they were doing it in an unfamiliar way. We had
never written instructions as specific as these before. It was a little alien to
our normal way but it was ‘what the customer wanted’. We were still mathematicians
first and knitters second so every booklet had to have some explanation of the maths
behind the design. We also thought it was essential to have a sheet in the centre
with the outlines of the finished hanging. This could be photocopied as often as
required and the knitter could experiment with their own colours. Somewhat surprisingly,
these sheets were also in demand by teachers who wanted to use the patterns and they
later became a loose-
Once the format was established it was relatively easy to adapt as each new idea
came along though it took a while to catch up the backlog of all the designs that
had gone before. All booklets refer to ‘afghan or wall-
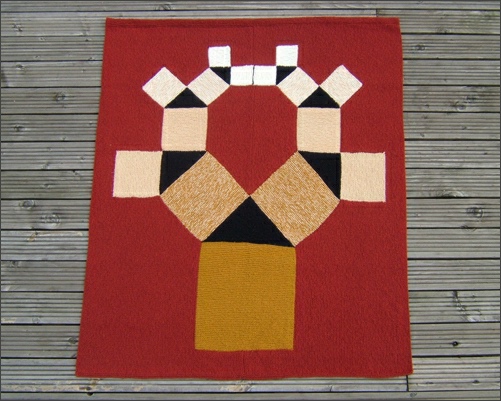
Our basic rule for adding triangles on the side of squares was based on Pythagoras Theorem so the time arrived when we thought we should make a more overt attempt to show the theorem as people expect to see it: ‘The square on the hypotenuse …’ It had to be more visually interesting than one triangle with a square attached to each side but we were limited in what we could do because we were still using the same angles as before and it didn’t give us many options. We drew what we decided was the only practical possibility and got yet another shock.
It started with one large square at the bottom with a triangle on top. Then a square was added to each of the free sides of these triangles. We intended to continue in this way until we arrived at a design we liked. To our amazement, as the squares and triangles swept round, two squares came together at the top to meet perfectly. Of course we should have known this would happen. It was an underlying property of so many other designs, relying on halving and doubling, but we just hadn’t realised what would happen when the process was stripped to its bare bones.
The first version of Pythagoras Tree was sold to the Science Museum so we made a second.
The two versions of Pythagoras Tree look very much alike but there is a difference in the use of yarn. The first was knitted with Aran yarns in a series of toning shades. By the time we made the replacement we had become intrigued by the potential of using two strands of yarn together to produce our own shades. It uses only three different colours for the squares, instead of the five colours in the first. The largest square has two strands of colour 1; the next has one strand of colour 1 and one of colour 2; the next has two strands of colour 2 and so on.
Although Pythagoras was a Greek, many people take this to be an Egyptian design. We named it Pythagoras Tree but, due to the colouring and the way it curves round, it is reminiscent of an Egyptian collar.